FidIG Installation Instructions
The following are instructions for swapping out your FID chimneys from the “loaner(s)” provided by AIC. Save the packaging material you receive and the box as well. There should be a return label in the box with both shipments for you to attach to the box when you have inserted the detector chimney(s).
Removing your chimney(s)
- Turn off the detector heater and turn off the fuel gases and allow the detector to cool to room temperature.
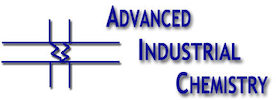
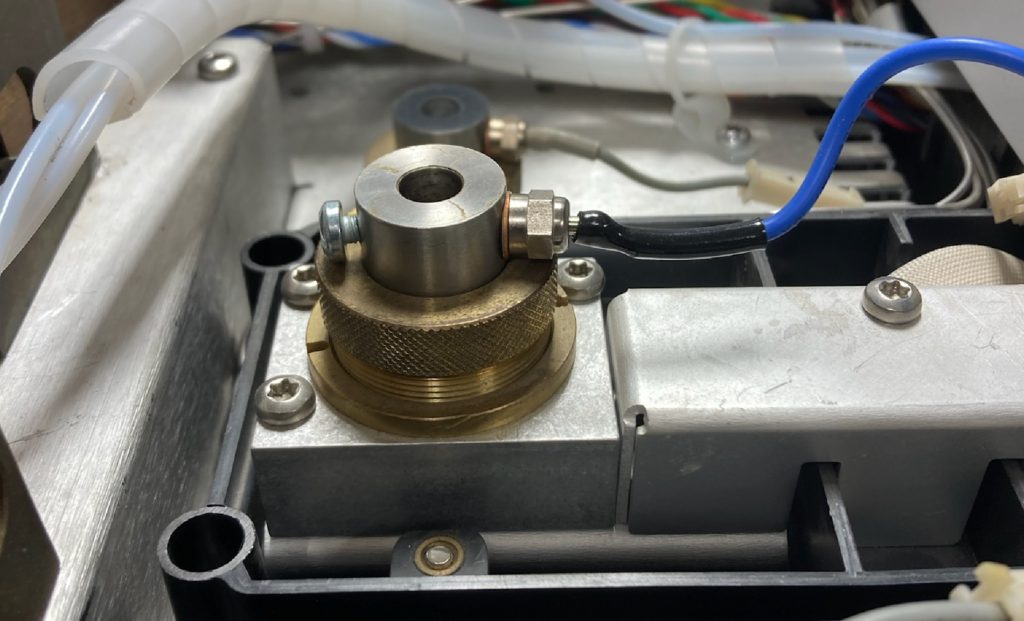
- Disconnect the glow plug wire at the white connection (1)
- Remove the glow plug (2) from the current FID chimney. It uses a 1/4″ wrench. Set aside for reuse
- Remove the chimney collar (3) from the current FID and set aside for re-use. Remove the wave spring from the chimney (not shown) and set aside for re-use.
- Remove the chimney (4) from the current FID.
Installing the New Chimney
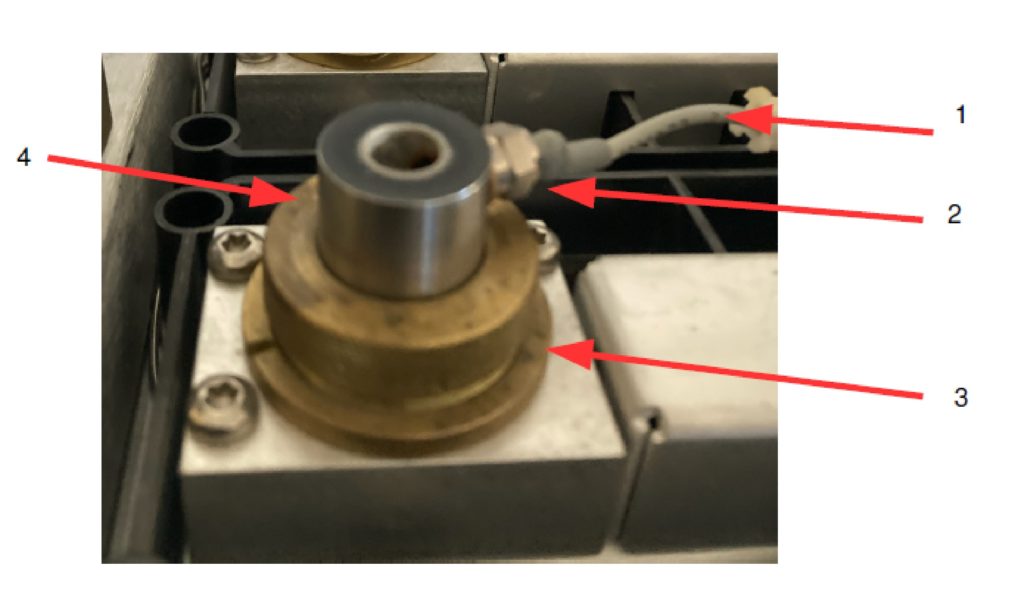
- Insert the new chimney into the detector. It should be resting on an insulator inside the detector.
- Slide the wave spring that was set aside over the new chimney.
- Slide the chimney collar that was set aside over the new chimney. Tighten this down finger tight plus about 1/8 turn. Do not over tighten.
- Re-install the glow plug that was set aside into the larger hole on the new chimney. Tighten this down finger tight plus about 1/8 turn more with a 1/4″ wrench. The brass o-ring on the ignitor should be snug to the chimney.
- Re-connect the glow plug wire.
- Thread the FidIG into the smaller M4 hole across from glow plug. Run the FidIG all the way into the chimney until it cannot be screwed in any more. There is no need to apply a wrench to this fitting at all. The FidIG should sit approximately 1/8″ away from the glow plug (almost completely across the inside of the chimney.)
- The detector is ready for operations.
- Turn the detector temperature back on and allow the detector to come fully to temperature.
- Confirm hydrogen flow on the GC in the normal manner. Confirm air flow on the GC in the normal manner.
- Use the front keypad of the GC and turn on the flame. The glow plug may glow for a bit before you hear the pop of the detector ignition. The signal should jump above at least 40 pA when the glow plug is lit. Then there should be a pop and the detector should switch from flame “Igniting” to flame “On”.
- One thing that has been observed on several installations – with the FidIG installed, the ignition process seems to spit (flames shooting out) more than a normal detector. This may be a function of the fact that the detector is indeed igniting, but DO NOT hover over the detector when it is lighting. Besides, you don’t need to – it will light all by itself.
Detector Maintenance
- Doing maintenance on a detector with a FidIG installed is very easy. If you need to install anything into the chimney such as a flow measuring adapter, simply loosen the FidIG screw until the tip of the screw is flush to the inside wall of the chimney. At this point, you can use any standard GC tool on the detector that you would otherwise need.
- If the FidIG was over tightened for some reason, you can use a standard Agilent Torx T-20 screwdriver (the one used for almost all of the other screws on the Agilent), to remove the FidIG from the chimney.
- Except in cases where the collector retainer has to come completely off, it should not be necessary to otherwise remove the FidIG from the chimney but rather to unscrew it until the inside diameter of the chimney is flush.
FidIG maintenance
- The FidIG bolt is made of materials that are very resistant to damage. However, if you need to remove the FidIG for any reason, a standard Torx wrench can be used on the screw head. A replacement FidIG screw (FI-230) can be re-threaded into the hole if necessary.
Installation Video